Changing the blade on your lawn mower is a crucial maintenance task that ensures your lawn is cut efficiently and safely. A sharp blade results in a cleaner cut, promoting healthier grass growth and enhancing the overall appearance of your lawn. But knowing how to change a lawn mower blade properly is not just about improving aesthetics; it’s also about safety and prolonging the life of your mower. This guide will walk you through the steps of how to change a lawn mower blade, covering everything from selecting the right replacement blade to the tools you’ll need for the job. Whether you’re a seasoned gardener or a first-time homeowner looking to take lawn care into your own hands, this guide will provide you with the knowledge and confidence to perform this essential maintenance task.
1. Gather Tools & Safety Gear
Before starting the most common way of changing the yard cutter edge, it’s essential to assemble the fundamental devices and security gear. Begin by finding a wrench or attachment set that fits the sharp side bolt on your particular trimmer model. Moreover, snatch a couple of uncompromising gloves to safeguard your hands from sharp edges and garbage. Security glasses or goggles are likewise vital for safeguarding your eyes from any flying trash during the sharp-edge expulsion process. Ultimately, guarantees you have a steady surface to deal with and that the cutter is switching off and separated from any power source. By social event these apparatuses and security gear, you’ll be completely ready to continue with the side substitution securely and proficiently.
2. Lift The Mower & Secure The Blade
To start the most common way of changing the grass cutter’s sharp edge, it means a lot to lift the trimmer to securely get to the sharp edge. Begin by finding a solid jack or backing stand that can lift the cutter safely. Cautiously position the jack or stand underneath the cutter deck, it is steady and adjusted to guarantee it. When the trimmer is lifte, find the side and analyze its condition for any indications of harm or wear. With the edge uncovered, utilize a block of wood or a comparative item to keep it from turning while you work. Getting the sharp side set up will forestall any unintentional development and make the edge evacuation process a lot more secure and more reasonable.
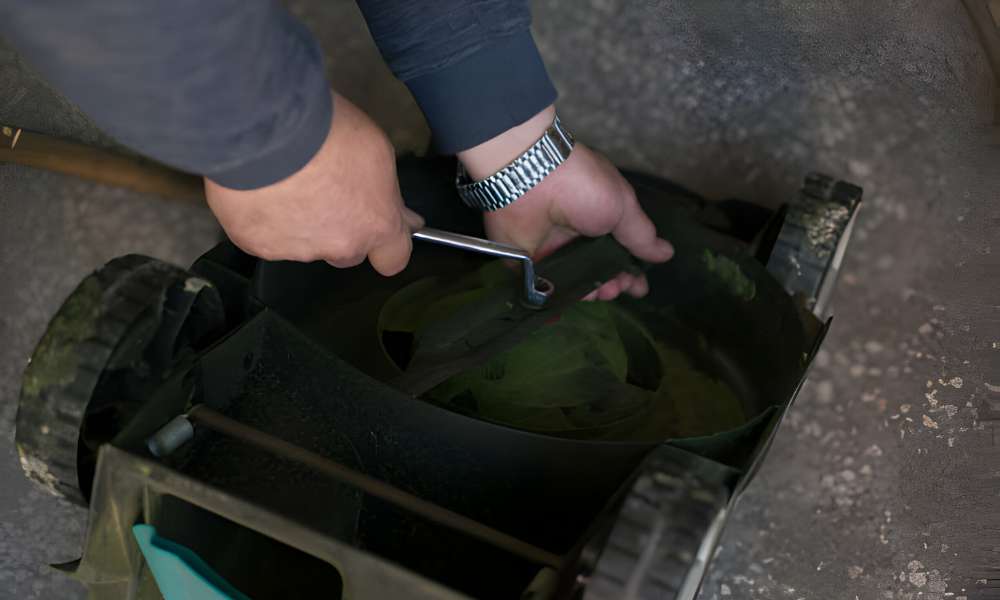
3. Remove Blade Bolt
With the cutter safely lifted and the sharp side appropriately got to forestall revolution, the following stage in changing the grass trimmer cutting edge is to eliminate the sharp side bolt. Utilizing the suitable measured wrench or attachment, cautiously slacken the bolt that ties down the edge to the cutter deck. It means a lot to turn the bolt counterclockwise, following the maker’s determinations, to abstain from harming the bolt or the encompassing parts. Contingent upon the cutter model, the side bolt might be tight, so applying consistent tension and conceivably utilizing an entering oil might be important to slacken it. When the bolt is completely released, cautiously eliminate it and put it away in a protected spot for reassembly later. With the bolt eliminated, the cutting edge can now be removed from the cutter for substitution or honing.
4. Replace With A New Blade
After eliminating the old cutting edge, the following stage in changing the yard cutter side is to supplant it with another one. Cautiously position the new sharp edge onto the trimmer deck, guaranteeing that it adjusts accurately with the mounting openings. Observe any markings or pointers on the cutting side that demonstrate the right direction for establishment. When the sharp edge is appropriately adjusted, embed the cutting side bolt through the middle mounting opening and hand-fix it to get the edge set up. It’s significant to guarantee that the site is situat equitably and safely to forestall any unevenness or wobbling during activity.
When the sharp side is ready, utilize the wrench or attachment to fix the sharp side bolt safely, following the maker’s determinations for force settings whenever given. With the new cutting side introduced and safely secured, you’re one bit nearer to finishing the grass trimmer edge substitution process.
5. Tighten The Bolt Securely
After situating the new cutting side onto the trimmer deck and embedding the cutting edge bolt, the following pivotal move toward changing the grass cutter cutting side is to safely fix the bolt. Utilizing the suitable measured wrench or attachment, cautiously fix the cutting edge bolt clockwise, guaranteeing it is cozy and secure against the trimmer deck. Applying even strain while fixing the bolt to forestall any lopsidedness or misalignment of the blade is significant. Try not to over-fix the bolt, as this might harm the bolt or the encompassing parts. Allude to the maker’s particulars for the suggested force setting, if accessible, to guarantee legitimate fixing. When the bolt is safely fixed, twofold check that the edge is immovably set up and appropriately adjusted. With the bolt fixed safely, you can continue certainly realizing that the new edge is safely join and prepared for use.
6. Lower Mower
In the wake of getting the new sharp side set up and guaranteeing that the cutting edge bolt is fixed safely, the subsequent stage in changing the grass trimmer side is to bring down the cutter back to the ground. Cautiously lower the trimmer from the jack or backing stand, guaranteeing that it dives uniformly and consistently. Take care to eliminate the jack or backing stand from underneath the cutter deck without bringing about any harm or obstruction. When the cutter is back on To Sharpen Lawn Mower Blades, twofold check that the sharp side is clear of any deterrents and that all instruments and gear have been securely taken out from the workspace. Letting the trimmer back down finishes this step of the interaction, setting it up for the last strides before testing the edge’s turn.
7. Test Blade Rotation
In the wake of finishing the sharp side substitution cycle and bringing the trimmer back down to the ground, it’s essential to test the sharp edge pivot before continuing ordinary activity. Begin the trimmer as per the maker’s guidelines, guaranteeing that all well-being precautionary measures are set up. Tune in for any strange commotions or vibrations that might show an issue with the side establishment. Also, outwardly investigate the sharp side as it pivots to guarantee that it is turning without a hitch and equitably. Assuming any irregularities are recognize during the test, promptly shut off the cutter and review the edge establishment to resolve any likely issues. Once happy with the cutting-edge revolution and by and large execution, you can certainly continue utilizing your grass trimmer, realizing that it is working securely and productively with the recently introduced cutting-edge.
8. Clean Up The Work Area
After effectively changing the grass trimmer side and testing its pivot, it means quite a bit to tidy up the workspace to guarantee security and association. Start by getting together any devices, gear, and garbage spread around the trimmer. Return instruments to their assigned stockpiling areas and discard any waste or old parts appropriately. Utilize a brush or cloth to clear away any grass clippings, soil, or flotsam and jetsam that might have collected during the edge substitution process. Give specific consideration to the region around the cutter deck and under the trimmer to forestall any possible risks or blocks. By tidying up the workspace completely, you not only keep a protected climate for future support undertakings but also show a pledge to legitimate grass cutter consideration and upkeep.
9. Store Tools Properly
Whenever you have finished the most common way of changing the yard cutter edge and cleaning up the workspace, it’s fundamental to store your instruments appropriately. Accumulate every one of the devices you utilized for the sharp side substitution, for example, wrenches or attachments, and return them to their assigned stockpiling areas. Guarantee that each apparatus is spotless and looking great before stashing it away. Legitimate capacity assists with forestalling harm or loss of devices and makes them promptly available for future upkeep errands. Consider putting resources into an instrument coordinator or tool kit to keep your devices coordinated and effectively open for the time you want to perform upkeep on your grass trimmer or other hardware. By putting away your instruments appropriately, you’ll be more ready for future upkeep undertakings and drag out the life expectancy of your apparatuses.
10. Dispose Of Old Blades Safely
In the wake of supplanting the grass trimmer cutting edge, it’s critical to discard the old sharp side securely and capably. Begin by guaranteeing that the old cutting side is not generally connect to the trimmer and cautiously handle it to keep away from any possible wounds from its sharp edges. Contingent upon your nearby guidelines and reusing offices, you might have the option to reuse the old edge as salvaged material. On the other hand, consider enclosing the old side rock solid cardboard or thick fabric to forestall any unintentional wounds and afterward discard it as per your nearby garbage removal rules. Try not to just dispose of the old cutting-edge ordinary family junk, as this could represent a danger to squander the board laborers. By discarding the old sharp edge appropriately, you guarantee security as well as add to ecological supportability by dependably overseeing waste materials.
Conclusion
Changing the sharp side of your yard trimmer is a somewhat straightforward yet fundamental undertaking that can essentially affect the nature of your grass care. By following the means illustrated in this aide, you can guarantee that your cutter works effectively, bringing about a conveniently managed yard and advancing solid grass development. Customary support, including cutting-edge substitution when essential, will draw out the life expectancy of your cutter and add to a very much-manicured yard that you can be please with. Make sure to continuously focus on security, assemble the essential instruments, and observe the producer’s rules for ideal execution. Given these tips, you’ll be able to handle this upkeep task effortlessly.